All About Tires
 Maintaining Your Van
 Read around 3,600 times
 For Everyone
Updated:


Youtube: googlevideo.com, youtube-nocookie.com.
Depending on the place you live in, or travel to, it may be necessary to choose some weather- or terrain-specific tires. Here's how to find out what you need and what will fit your van.
Snow & Mud
You might need snow chains (see
You need to enable javascript from Youtube (and possibly others), in order to see this video.
That oil scene.
All-Terrain
Similar to snow chains, all-terrain tires have huge treads with big gaps between, providing grip on rocky, muddy and sandy ground. If you're fun enough to have bought a 4x4 van for your van-life, to enjoy the odd bit of off-road adventuring, you'll definitely have noticed the extra-high ride height and chunky tires.
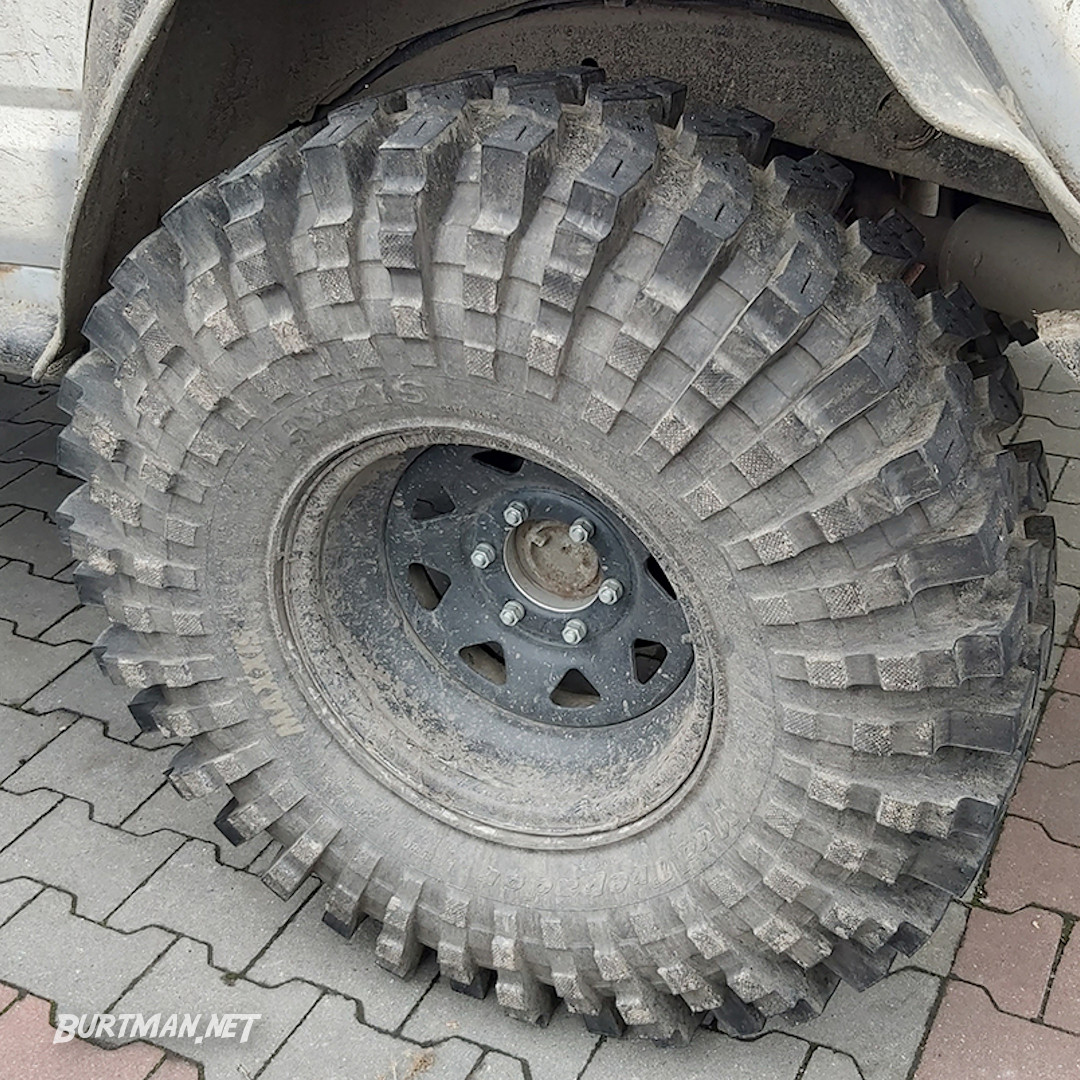
Deep tread means serious grip.
Pressure
You need to know how to use a
 Tire Pressure Gauge. This little tool instantly tells you how much pressure is in a tire, and because you read your van's service manual, you already know how much pressure there should be.
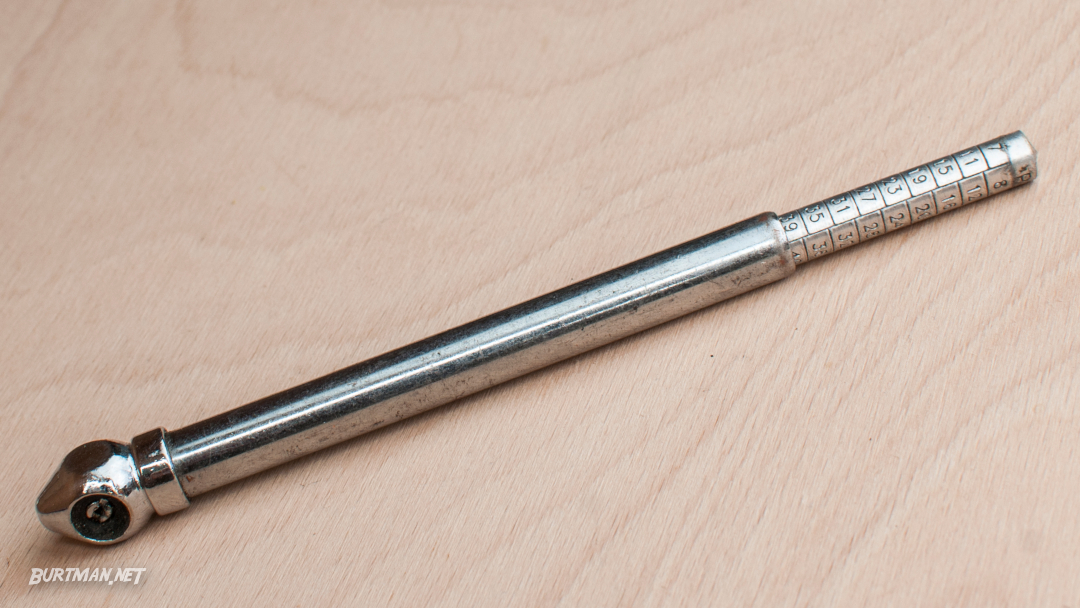
Press it over the tire valve to find out how much pressure is in the tire.
Of course, if your van is heavily loaded, you might need to reduce the tire pressure a bit to ensure that you aren't putting too much strain on your tire walls. You'll also want to do that if you're driving a long distance, or if it's very hot. That's because air expands when it gets hot, so you could end up with over-inflated tires, which means reduced road grip and the risk blowing out at high speed. All very bad things.
Tread Depth
You will need to use a
Tread Depth Gauge to find out if you have enough grip to stay safe on the road (and to keep free of hassle from 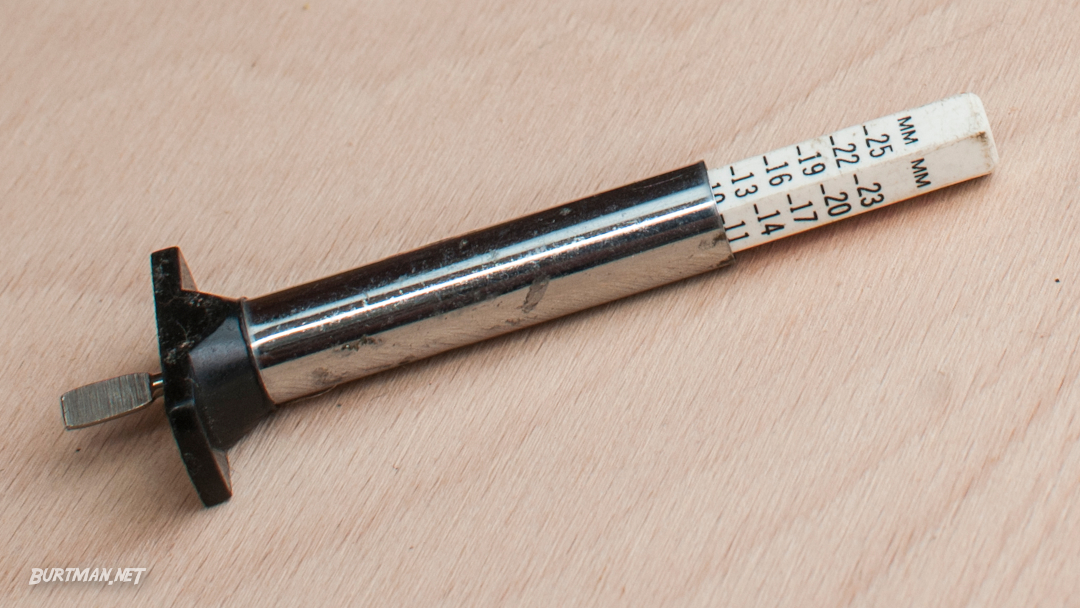
This syringe-like device is as simple as it gets. You push the gauge down to make the pointy bit poke out, then you poke the pointy bit into the groove between grippy bits on your tire and press down until the flat bit rests on the tire. Then you just look around the numbery bit until you see a line that sits exactly (or near enough exactly) on the edge of the silver bit. I know it's a lot of technical terms, but try to keep up.
Spare Wheels
If you don't have a spare wheel, go and get one right now. And not a space-saver, if you can avoid it. A real wheel that you can use long term. Why? Well, space-savers are great for saving space (someone should tell them about this coincidence), and they are meant to get you home. That's why they are rated at 50mph / 80km/h in most places. Fast enough for the city. But you're going out on the road and you don't have a place to call home besides wherever you are already. So that's not very helpful.
If you blow out a tire in a remote village, or some place nobody knows, you need to replace it like-for-like, so you can continue your journey. Most vans have space underneath for a full-sized spare wheel, and you should make sure it's occupied. By the way, just because your van came with a spare doesn't mean it's any good. Have you checked it lately? See above methods for determining if it's any good.
As a rule, if it looks a bit shady, it might be. Go get it looked at in the tire place before you set out, in case you need a new one. Since it's flying underneath the van, it can get hit by rocks and junk from the road, causing damage to the side walls and potentially ruining it. Just something to think about.
And don't forget, there's no point having a spare wheel, unless you know ![]() How To Change A Wheel.
How To Change A Wheel.
How To Find A Fit
It's all well and good buying snow chains and new tires, but how do you find out if they're going to fit your van? Well, that's easy. It's written on the side of every tire (as well as in your owner's manual, which you've read more than once by now). Every tire has markings all over it. The bit you are interested in at this moment looks like this:
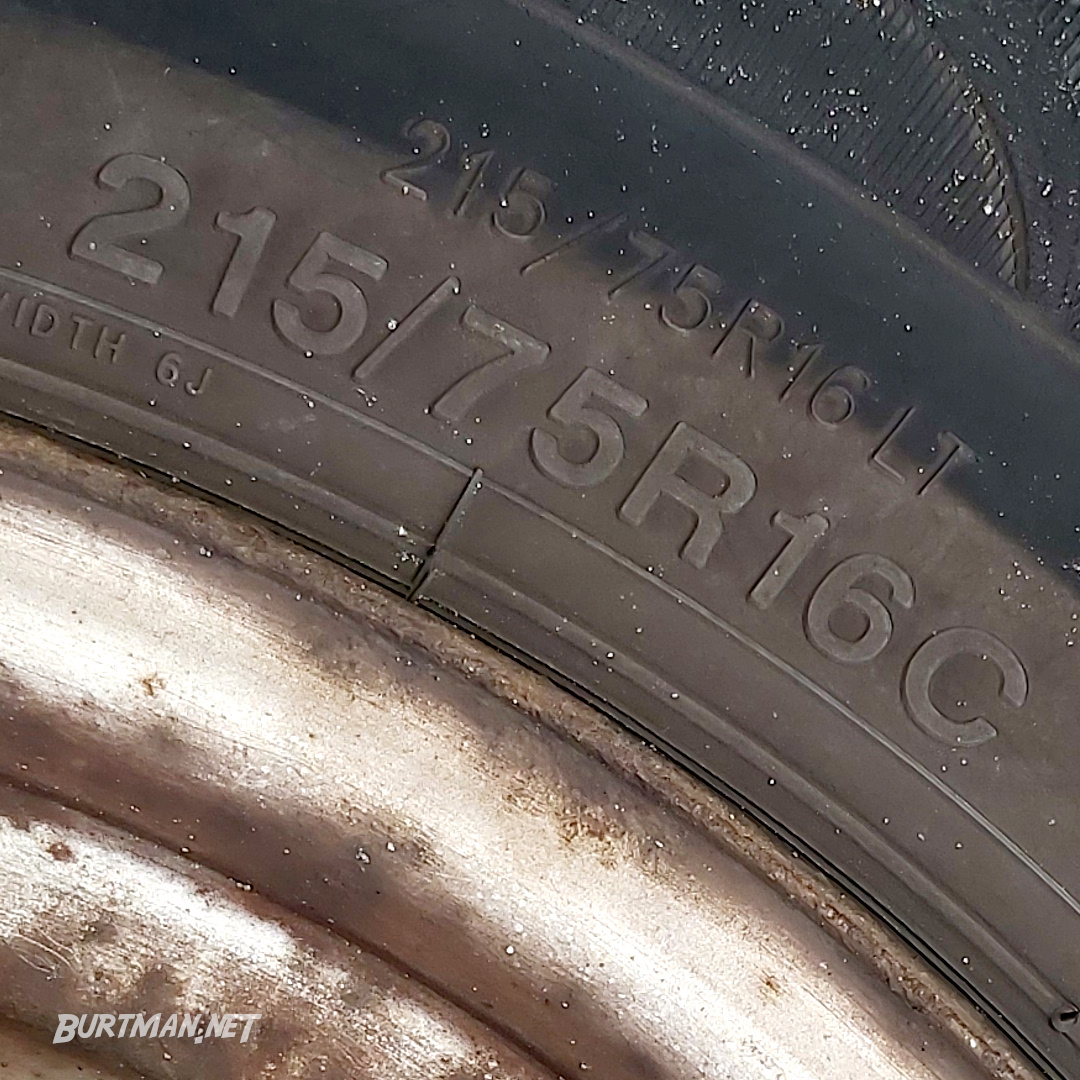
Let's break it down:
You may see a letter such as P in the first position, but may not show up on your tire. It's a US-specific marking for buses. LT stands for light truck. You may see other markings, depending on the weight of your vehicle and how it is classified in your area.
The main part of the reading is:
215 is the width of the road-facing surface in millimeters.
75 is the aspect ratio (the percentage of the first number that equals the height of the tire wall, from wheel rim to tire tread) - in this case, 215 * 0.75 = 161.25mm.
R means the tire is constructed with steel belts that are arranged radially (around the tire), as opposed to cross-ply. This won't matter much unless you intend to use your van for off-road adventures, but I would always recommend buying the same type of tire that the van was originally sold with.
16 is the diameter of the wheel in inches. Don't ask me why the first part is in mm and this part is in inches. You can always look it up if you're curious. :)
C means the tire is rated for commercial use. The following explanation is from goodyear.com:
"Both of LT and C-Type tire types are reinforced to carry a heavier load than a typical passenger car tire. However, the C-Type tire is meant to handle a heavier load than an LT tire in equivalent size, though generally rated for a lower speed."
If you give these numbers to the tire guy, you'll get a tire that fits your van exactly. Of course, you can always have them check, if you are confused, but they will just read these numbers from the tire.
Other markings you may be interested in:
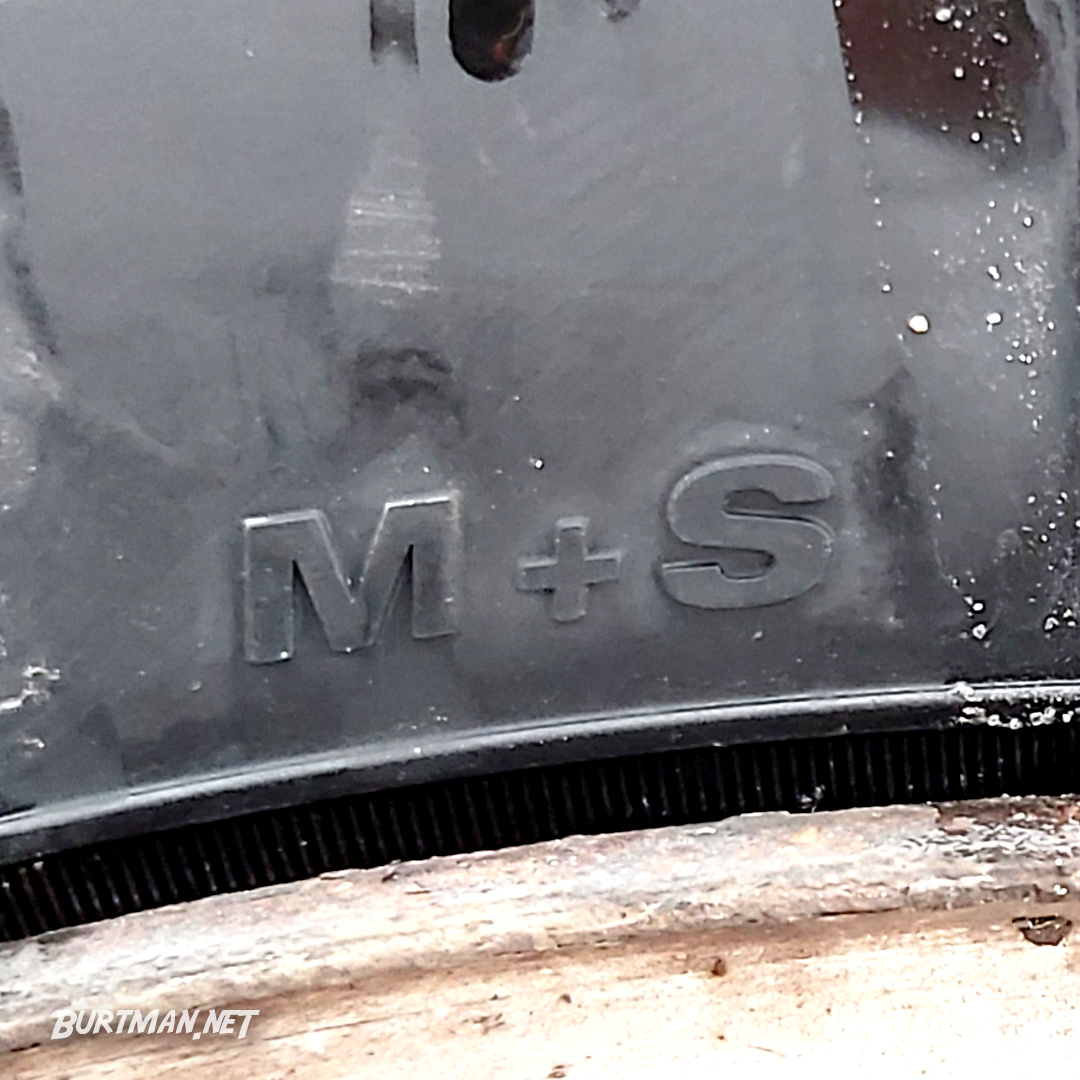
M+S has nothing to do with over-priced dip. It means the tire is rated for mud and snow. In this case, snow chains will not likely be required (although they can still help in really slippery conditions).
Direction of rotation (arrow)*, which is important, so don't ignore it. If you're changing from summer to winter tires by swapping wheels, make sure this arrow faces forward. If it doesn't, that wheel goes on the other side of the vehicle.
* Don't think that reversing is going to cause any trouble with directional tires. Just make sure they are fitted with the arrow facing in the forward direction, as the direction becomes more important with increased speed.
Year of manufacture, which may be relevant in your location, depending on inspection rules.
Maximum inflation pressure, which is extremely important (see below).
Load limits tell you how much weight a given tire can carry safely. Never exceed this weight. Blow-outs can be deadly.
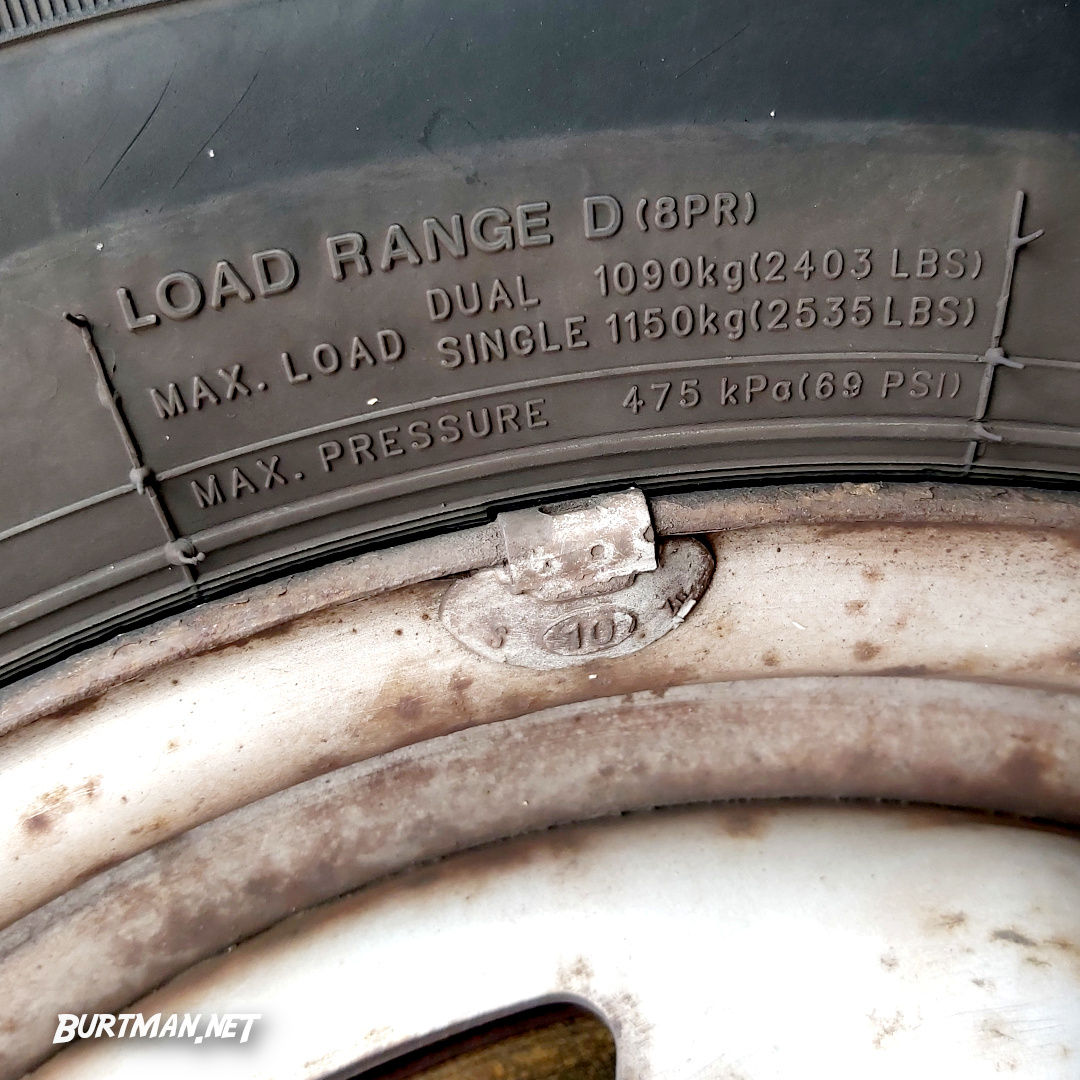
Load limits depend on how much of the load each wheel is carrying.
Single and Dual refer to whether the wheel is mounted on its own or as one of a pair. In dual wheel setups, the rear axle has two wheels fitted on each side. This is only found on larger vans and trucks.
You can find a plate with all the necessary load and pressure info on the inside edge of the driver's doorway (that's called the B-post, if you're curious).
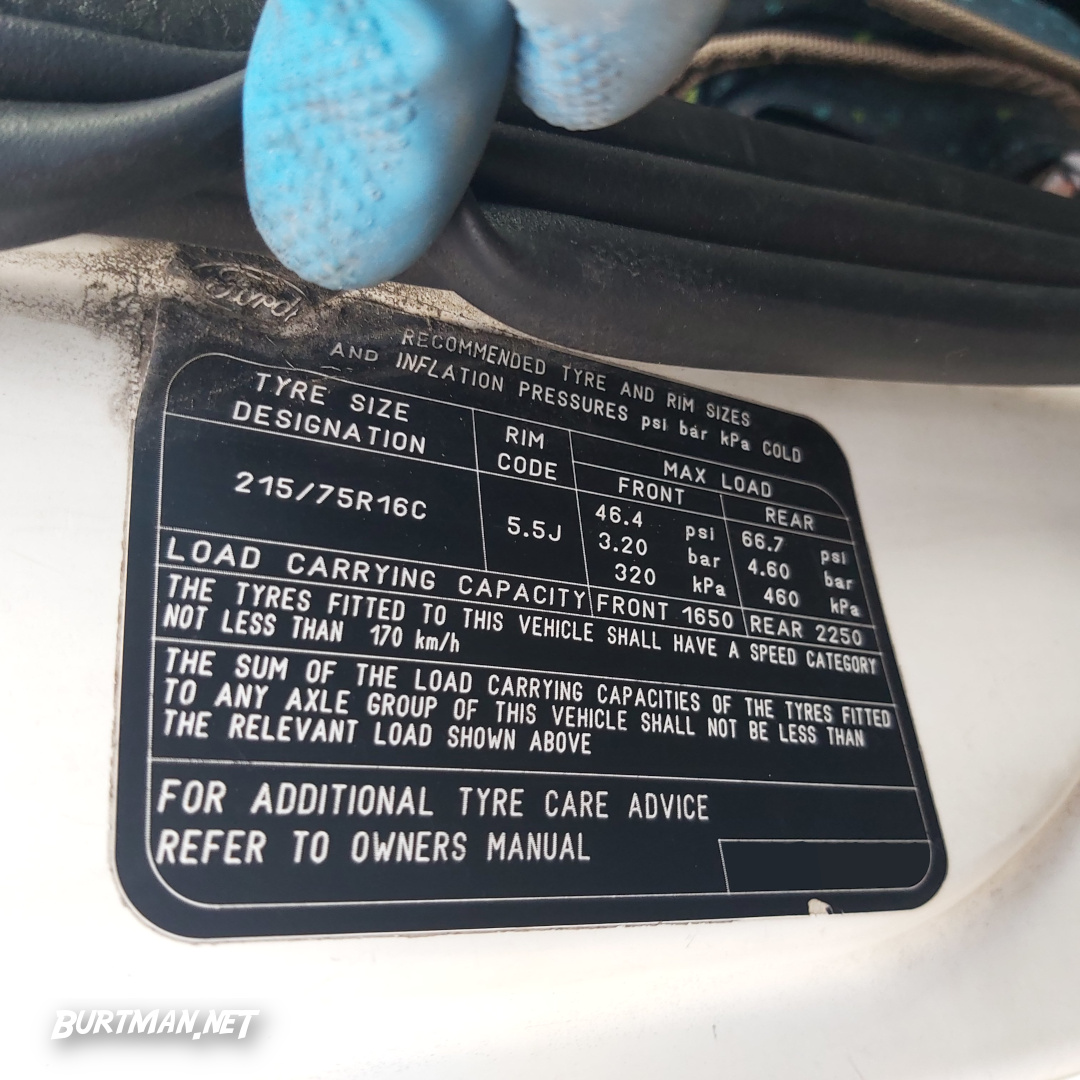
All the info you need is on the tire but you should also find a plate like this one that gives more info. This is located on the driver's side B post (open the door and look in the doorway).
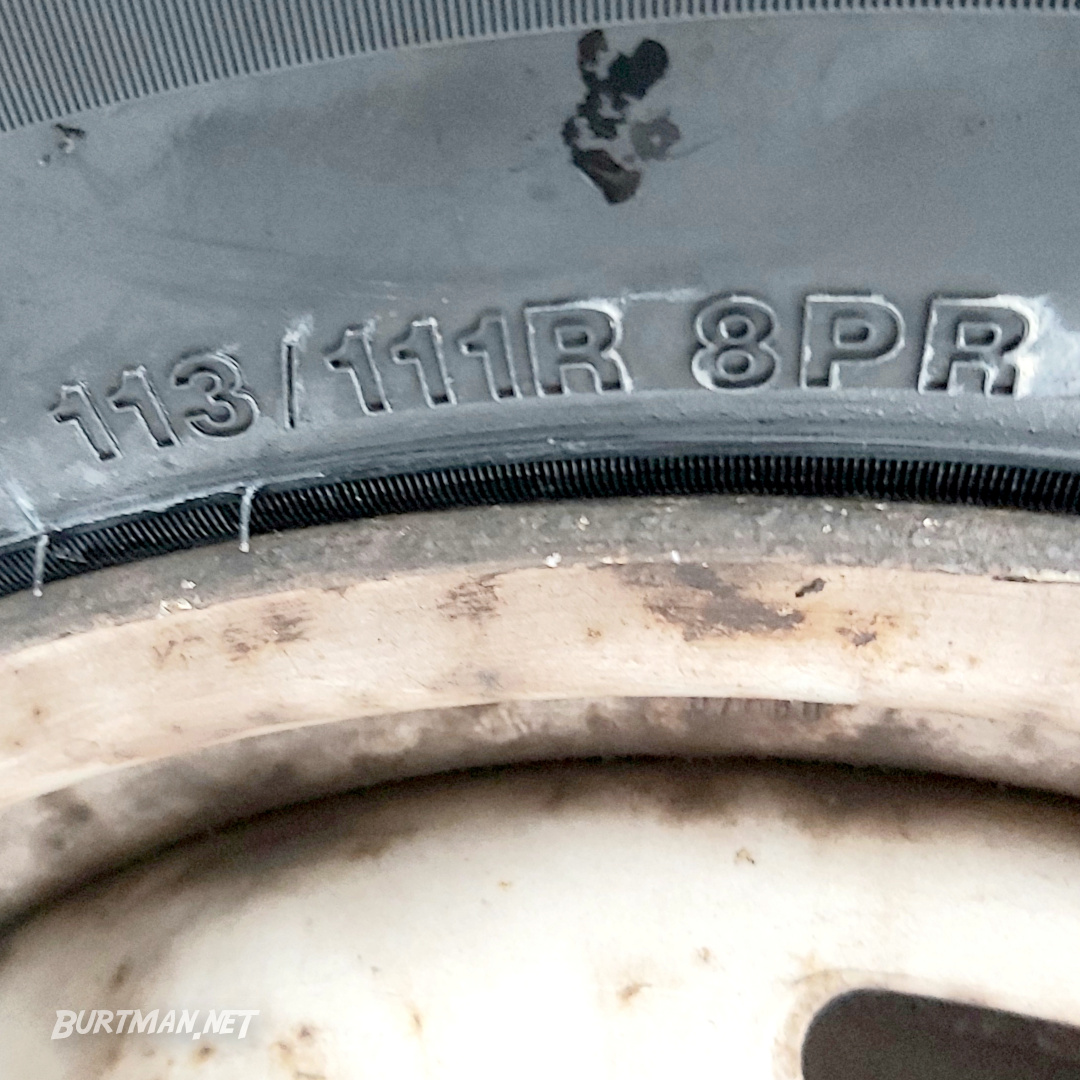
When shopping for new tires, you will probably be asked for the load index. If you can't find that on your tire or on the info plate, you can skim this simple chart, looking for the max load in lbs and it will tell you the weight index.
Weight Index Chat (TiresPlus.com)
From the image above, you can see that my tire is rated at 2535lbs when used in single wheel layout. From this chart, it's easy to find out that the weight index is 113. You can also find this directly on the tire.
There are sometimes more markings, depending on where the tire manufacturer intended to sell the tire. All markings will be useful to know at different times, but the most important in most cases is the max. pressure marking, because you will check and adjust tire pressure at various times throughout the year, and depending on your use. Always check every tire before inflating, as you may even find different ratings on the same vehicle, if, for example, you have a twin-axle or dual-axle setup, where the rear load is intended to be shared between several wheels on one or more rear axles.
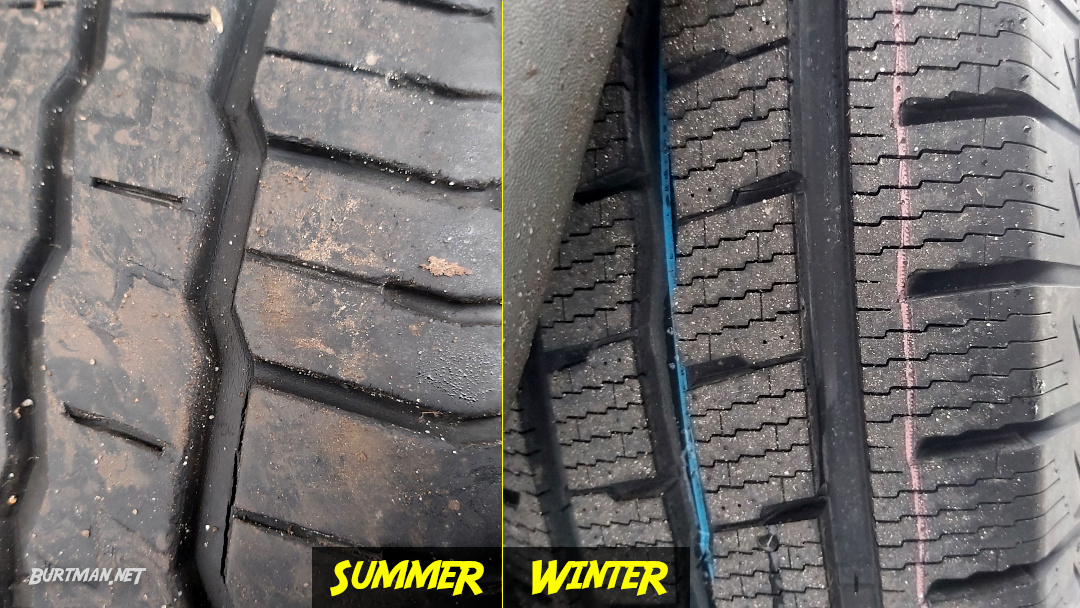
What's the difference between summer and winter tires?
Summer tires are made from a harder compound than winter tires. They last longer because of it, but they have less grip. That's usually not a problem in the summer, though, as there isn't snow and ice on the road and the heat of summer also increases the amount of grip available by slightly softening the rubber.
Winter tires also have a very different look about them, with many times more ridges, creating a greater grip surface area and more channels for water to escape. This improves grip by displacing snow and mud more quickly as you move over it, increasing contact with the road.
If there's anything I've missed or confused you with, let me know in the comments.
Sign In To Leave A Comment
There are no comments marked as public for this item.
Stay Up To Date